(Removed old image) Tag: Visual edit |
No edit summary Tag: Visual edit |
||
| Line 1: | Line 1: | ||
== Introduction == |
== Introduction == |
||
| − | The purpose of this guide is to help you get started making your first hook mod with Partiality and is more or less a more beginner friendly version of the existing Partiality Modding guide which you can find [https://drive.google.com/file/d/15efTIe4WxvyW8ZN0MwTgeTfQdE932SB1/view (Here)] |
+ | The purpose of this guide is to help you get started making your first hook mod with Partiality and is more or less a more beginner friendly version of the existing Partiality Modding guide which you can find [https://drive.google.com/file/d/15efTIe4WxvyW8ZN0MwTgeTfQdE932SB1/view (Here)] |
| + | ===== '''EDIT (13th June 2020): The above Partiality tutorial by topicular has been updated and provides guidelines on how to use some important community made tool mods like ConfigMachine and EnumExt.''' ===== |
||
| + | |||
| + | ======<nowiki/>====== |
||
You will be guided through installing Visual Studio 2019 Community (VSC) and setting up your first project for use with Rain World modding. By the end of this tutorial you should have a basic understanding of how hook mods work and how to make them. What you decide to make after that is up to you. |
You will be guided through installing Visual Studio 2019 Community (VSC) and setting up your first project for use with Rain World modding. By the end of this tutorial you should have a basic understanding of how hook mods work and how to make them. What you decide to make after that is up to you. |
||
Revision as of 13:24, 13 June 2020
Introduction
The purpose of this guide is to help you get started making your first hook mod with Partiality and is more or less a more beginner friendly version of the existing Partiality Modding guide which you can find (Here)
EDIT (13th June 2020): The above Partiality tutorial by topicular has been updated and provides guidelines on how to use some important community made tool mods like ConfigMachine and EnumExt.
You will be guided through installing Visual Studio 2019 Community (VSC) and setting up your first project for use with Rain World modding. By the end of this tutorial you should have a basic understanding of how hook mods work and how to make them. What you decide to make after that is up to you.
Important note: You are expected to have at least a basic understanding of programming. This guide will not teach you the C# programming language. However, once you have completed this tutorial you can use modding as an opportunity to learn, set your sights on a simple goal and work your way to understanding what you need to do to make it happen.
Setting up Visual Studio
In order to make our mods we'll be using Visual Studio Community 2019, but we'll need to install certain components so that we can work with Rain World. First download VSC from the link below and follow the steps to install what we need.
Download and install Visual Studio Community 2019
- On the above page navigate to "Visual Studio IDE" and select "Community 2019" from the drop down list.
- Open Visual Studio Installer and click "Install" for Visual Studio Community 2019.
- In the "Workloads" tab, check the box next to ".NET Desktop Development".
- Navigate to the "Individual Components" tab and make sure ".NET Framework 3.5 Development Tools" is checked.
- Finally, click "Install" in the bottom right and wait for everything to install.
Once everything is installed you will be prompted to sign in with a Microsoft or Github account. You can click "Not now, maybe later" but will be restricted to 30-day trial period, after which you will have to sign in.
Your First Project
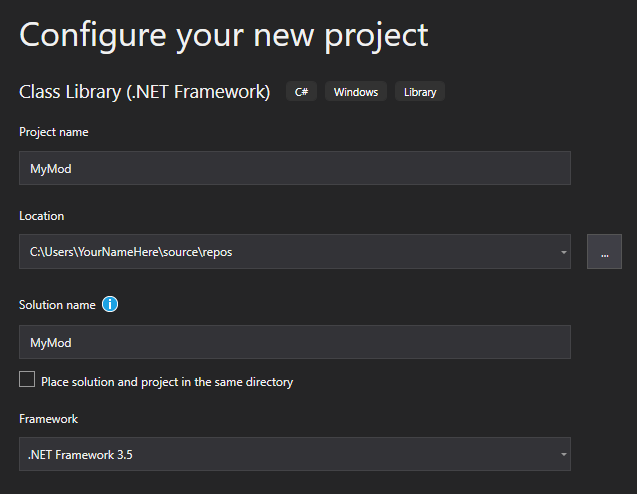
The settings we need for our new project.
With Visual Studio installed we can now begin setting up our new project:
- Once installed, open up VSC2019 and select "Create a new project".
- Select "Class Library (.NET Framework)" from the template list and click next.
- Give your Project a name, for this tutorial we'll be calling ours "MyMod".
- Make sure ".NET Framework 3.5" is the chosen framework from the drop-down list.
- Click Create.
Optionally: enable dark mode via "Tools -> Options -> Color Theme -> Dark -> OK"
Adding References
Before we can start making our mod we'll need add some references in Visual Studio that will let us interact with Rain World's code, Partiality and more. We'll need four references in total which you can get by following the steps below:
- Download and install the Partiality Launcher by following the instructions under the "Installing Mods" section on RainDB. (Here)
- Download PublicityStunt from (Here) and place it in your "Mods" folder.
- Open the Partiality Launcher and make sure ONLY PublicityStunt is checked, then click "Apply Mods".
- Copy and Paste the following files from their original locations to somewhere safe:
- Assembly-CSharp.dll from "Rain World\RainWorld_Data\Managed"
- HOOKS-Assembly-CSharp.dll from "Rain World\RainWorld_Data\Managed"
- Partiality.dll from "Rain World\RainWorld_Data\Managed"
- UnityEngine.dll from "Rain World\RainWorld_Data\Managed"
- Head back into Visual Studio and select "Project -> Add Reference..."
- Click "Browse..." and navigate to the safe location you copied the above files, select all of them and click "Add".
- Finally once you see all four references added to the list, click OK.
Congratulations, we're almost ready to start modding!
Working with Partiality
Before we dive into modifying Rain World's code, we first need to set up a couple classes so that Partiality can properly interact with and apply our mod to the game.
Direct your eyes to the Solution Explorer in the right hand pane of Visual Studio, at the bottom of the list you should see "Class1.cs" which is created by default with each new project, this should be what you are currently looking at in the main view. If isn't, simply double-click "Class1.cs" to open it. We'll be repurposing this class for some initial setup.
- Right-click "Class1.cs" in the Solution Explorer and select Rename, and change it to "MyMod.cs".
- Next, delete all the code contained in the MyMod Class and replace it with the code below:
using System;

using System.Collections.Generic;

using System.Linq;

using System.Text;

using Partiality.Modloader;

using UnityEngine;

public class MyMod : PartialityMod

{

    public MyMod()

    {

        this.ModID = "MyMod";

        this.Version = "0100";

        this.author = "YourNameHere";

    }


    public static MyMod instance;


    public override void OnEnable()

    {

        base.OnEnable();

	//Hooks go here

    }

}
At this point make sure to save the Project by selecting "File -> Save All".
If everything has been set up and copied correctly you should be able to select "Build -> Build Solution" without errors. This will generate a "MyMod.dll" file which is what you and others will put in their mod folder and apply. If you want you can change the build location to be the Rain World mod folder itself, so that when you make any changes to your mod and compile it, you won't have to copy the file each time.
You can do this by selecting "Project -> MyMod Properties... -> Build -> Output -> Browse..." and set the directory to Rain World's mods folder.
And with that, we are finally ready to start modding. The next section will run you through a simple example so you can get a basic understanding of how to make your mods.
Simple Example
With Visual Studio installed, our references added and our mod able to be read by Partiality, we can finally start adding code that will modify the game itself. For the purpose of this tutorial we'll be doing something simple, changing the Survivor's food meter:
- Create a new class like before and name it "FoodMeter" and click Add.
- Next, inside our new "FoodMeter" Class we'll create a Method called Patch(). This is where we'll be adding hooks to existing Rain World code. For this example, copy and replace any code in the "FoodMeter" class you just made with the code below:
using System;

using System.Collections.Generic;

using System.Linq;

using System.Text;


public class FoodMeter

{

    public static void Patch()

    {


    }

}
Inside the curly brackets underneath Patch() is where we'll hook the existing Food Meter code, for this we'll be using our old friend DnSpy which if you don't have already, can be downloaded from (Here).
Open up DnSpy and select "File -> Open", Navigate to "Rain World\RainWorld_Data\Managed" and select "Assembly-CSharp.dll" and click "Open".
Expand the .dll in the left pane by clicking the arrow and then expand the section above "ArenaBehaviors" which should appear simply as " - ". You should be greeted with a massive list of Classes. For the purposes of this example we'll need to scroll down to the Class named "SlugcatStats" and expand it
Inside SlugcatStats you should see something called "SlugcatFoodMeter". This is what we've been looking for so select it from the list.
switch (slugcatNum)

        {

            case 0:

                return new IntVector2(7, 4);

            case 1:

                return new IntVector2(5, 3);

            case 2:

                return new IntVector2(9, 6);

            default:

                return new IntVector2(0, 0);

        }
This code here controls the amount of food each Slugcat can store and how much they need to hibernate. The cases refer to each Slugcat. Whenever you see the Slugcats being referred to by a number, 0 is Survivor, 1 is Monk and 2 is Hunter. The first number in the brackets is the max amount of food the Slugcat can eat and the second is the amount needed to hibernate.
So, we know where the code for the food meter is and what we need to change, but how do we do it? This is where we create our first hook.
Within the brackets for the Patch() Method we created, type the following:
On.SlugcatStats.SlugcatFoodMeter +=
Once you've finished typing += you'll be prompted to press TAB, do this and the code needed to create the hook will be added for us.
You'll notice that as we were typing, Visual Studio offered suggestions for existing classes in Rain World's code, you'll be using this feature a lot.
Your class should now look like this:
using System;

using System.Collections.Generic;

using System.Linq;

using System.Text;


public class FoodMeter

{

    public static void Patch()

    {

        On.SlugcatStats.SlugcatFoodMeter += SlugcatStats_SlugcatFoodMeter;

    }


    private static RWCustom.IntVector2 SlugcatStats_SlugcatFoodMeter(On.SlugcatStats.orig_SlugcatFoodMeter orig, int slugcatNum)

    {

        throw new NotImplementedException();

    }

}
The new code added below our Patch() Method is where you'll make any changes to what you just hooked. Head back over to DnSpy and copy the contents of the original "SlugcatFoodMeter" and paste it inside the brackets of our hook, making sure to delete/overwrite the "throw new NotImplementedException();" that was created by default.
Once that's pasted in you'll see that all instances of "IntVector2" are underlined in red, that's because currently our FoodMeter Class doesn't contain a definition for what an "IntVector2" is. If you mouse-over one of the underlined pieces of code you will a get a pop up in which you can click "Show potential fixes" and from there select "Using RWCustom;. You can alternatively add the following line to the top of the class:
using RWCustom;
With that done, the class should now look like this:
using RWCustom;

using System;

using System.Collections.Generic;

using System.Linq;

using System.Text;


public class FoodMeter

{

    public static void Patch()

    {

        On.SlugcatStats.SlugcatFoodMeter += SlugcatStats_SlugcatFoodMeter;

    }


    private static RWCustom.IntVector2 SlugcatStats_SlugcatFoodMeter(On.SlugcatStats.orig_SlugcatFoodMeter orig, int slugcatNum)

    {

        switch (slugcatNum)

        {

            case 0:

                return new IntVector2(7, 4);

            case 1:

                return new IntVector2(5, 3);

            case 2:

                return new IntVector2(9, 6);

            default:

                return new IntVector2(0, 0);

        }

    }

}
Now we can change The Survivor's food meter to be whatever we want, so do that now. Just make sure the second number in the brackets isn't higher than the first one.
Our first hook is now finished! There is only one more step before we are ready to compile our mod. Navigate back to our MyMod Class (making sure to save our changes). Within our OnEnable() method we need to add our FoodMeter hook. So simply add the following:
FoodMeter.Patch();
And that's it, we are ready to build. Select "Build -> Build Solution" and if you did everything right the mod should build with no errors or warnings.
Navigate to where your compiled "MyMod.dll" has been saved and copy it to your Rain World mods folder. If you previously changed your build location to the mods folder as mentioned above then it should be there already.
Open up Partiality Launcher and enable your mod and click "Apply Mods". Fire up Rain World, Start or Continue a saved game for Survivor and take a look at the fruits of our Labor. You've just created a Partiality Mod!
Further Reading
If you've succeeded in making your first mod using the tutorial above and want to learn more, I encourage you to take a look at topicular's far more in-depth modding tutorial which you can find (Here) as it includes a wealth of information on how large parts of Rain World work, as well as additional examples and guides on how to use tools like ConfigMachine and EnumExt.
You can also feel free to ask for help in the #modding_support channel on the Rain World Discord server. (Here)